Verifying your download
Probably a dozen people have reported having their coins stolen, and any who were willing to investigate found they had downloaded a malware version of ElectrumSV and not an official download. More than one asserted that they had downloaded from our web site, but what they meant was that they had downloaded from a fake web site that had stolen our design.
Downloading an executable from a web site and running it is risky, and what you are putting your trust in, is that because you download from our official web site you are getting an executable you can safely run. Despite this, well meaning people have downloaded from fake versions of our web site, and paid the price for it.
It is in your best interests to verify your download is the official one. The goal of this page is to try and show you how to do that.
What are you verifying?
You will be checking the checksum (also known as a hash) of the file you downloaded. This is a standard algorithm that you can get lots of different software for, which will give you a series of letters and numbers that represent the uniqueness of your file. The algorithm we use for ElectrumSV is called SHA256 and we provide an official checksum for each file we make available. You will be comparing that official checksum to the one generated for your file. If it is the same, you should have the official version of that file. If it is different, you have downloaded malware instead.
The official checksums
We do not provide the checksums on the official web site where you find our download links, because this allows any attacker who manages to compromise the web site, to also replace the official checksums. Additionally, if there is a fake web site that offers both download links and checksums you should know something is fishy.
The official checksums are available from Github, where our open source code is located. You do not need to compare against the illustrative screenshot below, just click on the Github link and view them there.
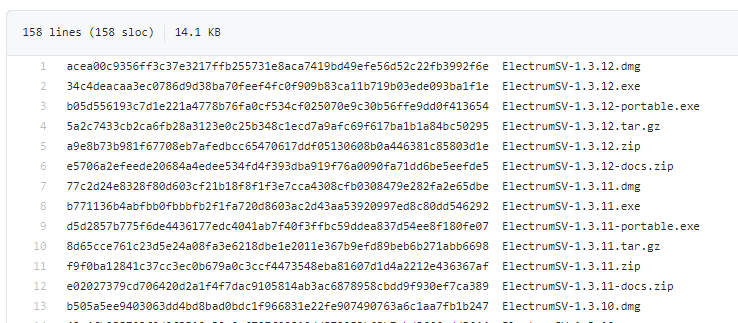
The list SHA256 hashes for the official downloads.
Verifying your download
There is no easy way to check a download. Some level of technical competence is useful, although if you do not consider yourself technically competent and can follow instructions you should still be able to do it. Others have managed to do it, and as we get these instructions into a more approachable state over time, you should be able to as well.
Find your operating system below, and check out the options listed for it. Some of them may be better than others, but some assurance that your download is legitimate is better than nothing.
Windows
Several methods of verifying your download on Windows are provided below. Any one should be good enough, but if you are a user who primarily uses a web browser you may need to learn to use the explorer or console.
Using the digital signatures
Thanks to the kindness of the Bitcoin Association, we now have the ability to sign our Windows
executables from version 1.3.12 and above. In theory the presence of our signature on the
executable you downloaded should be just as reliable as checking the checksum. You can check if
the executable you downloaded has our signature, and if it is present you can assume that the file
should be legitimate. Your first step is to find the executable you downloaded with the Windows
explorer. You can open the Windows explorer with the windows and e key, then locate the
directory your executable is located in.
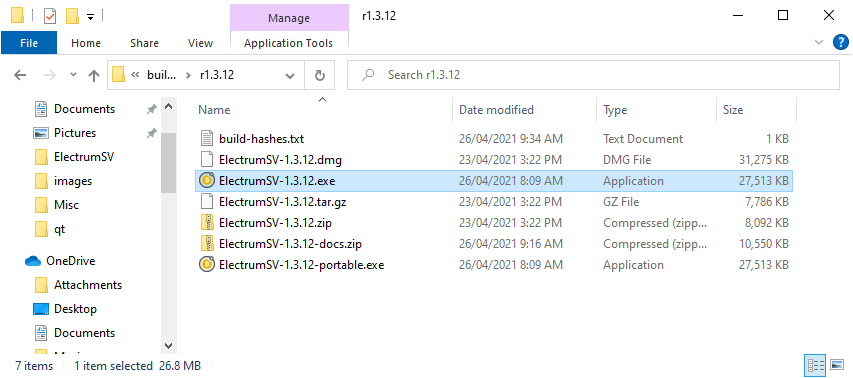
Windows explorer.
Right click on the file, and select Properties. This should open the properties window for the
file, where you should select the Digital Signatures tab to see the signature.
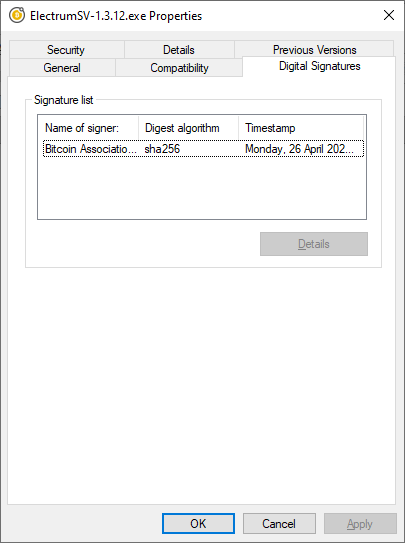
The digital signature.
From there click on Details and then View Certificate. You should see a certificate with
the following information for the given version.
1.3.12 and above
The certificate should be issued to Bitcoin Association for BSV, be issued by
COMODO RSA Extended Validation Code Signing CA and as of the time of writing be valid
from 10/11/2020 to 11/11/2022.
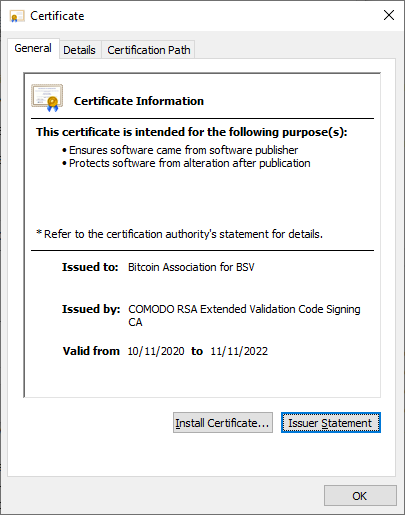
The certificate the file was signed with.
Using certutil
certutil is already present in your Windows installation already. However, it requires opening
a command prompt to run it, which might be something beyond some users. Press the Windows key and
the s key at the same time, this will open the Windows searchy thing and there you can type
cmd and then press the enter key to open a command prompt.
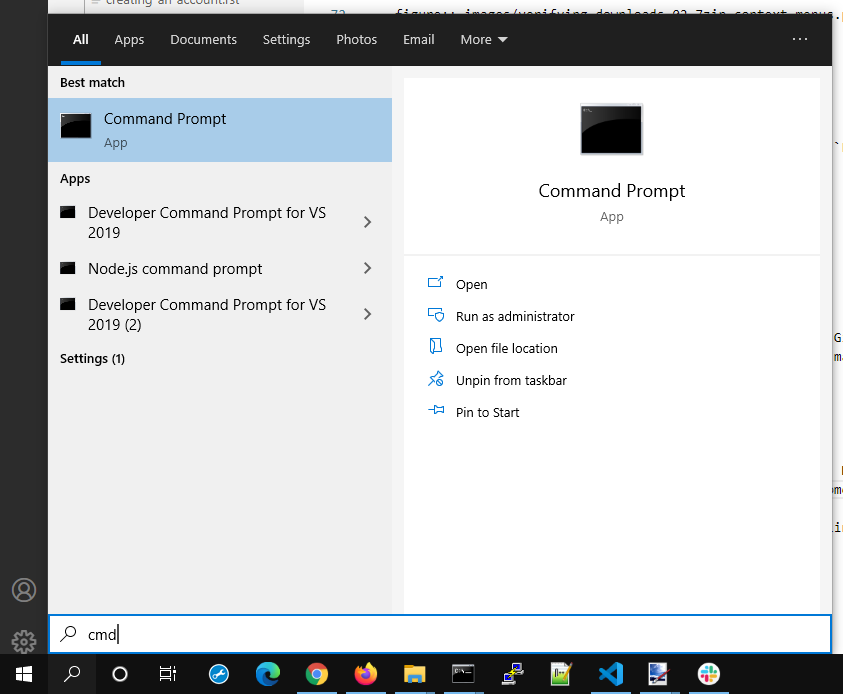
Opening a command prompt.
Then you need to change the directory until you are in the same directory as the file you wish
to get a checksum for. The cd command is used for this. Then you can use the certutil command
to generate a SHA 256 checksum for that file. The syntax is
certutil --hashfile <filename> SHA256, but remember you need to replace <filename> with
the actual file name. You can see an illustration of this in the image below.
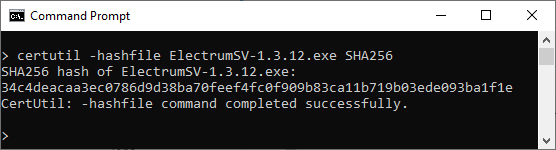
The certutil checksum result.
If you find the ElectrumSV-1.3.12.exe entry in the
linked Github list,
you can see it matches the certutil checksum result. The case of the letters does not matter,
both lower case and upper case are equivalent. If you get a different result, and the command
complains that it cannot find the file, then the file is not in the current directory. You need
to use the cd command to change the current directory as mentioned above.
Using 7-Zip
This requires that you download the 7-Zip installer. Any of the non-standalone executables from the 7-Zip web site, should be fine. Download one and install it. Once it is installed, you should have a handy context menu available that can give you the SHA 256 checksum for your file. Simply select your file, open the context menu and generate the checksum. Do not reflect on the fact that no-one in their life ever wanted to “Share with Skype” and that they put it up the top before all the useful stuff.
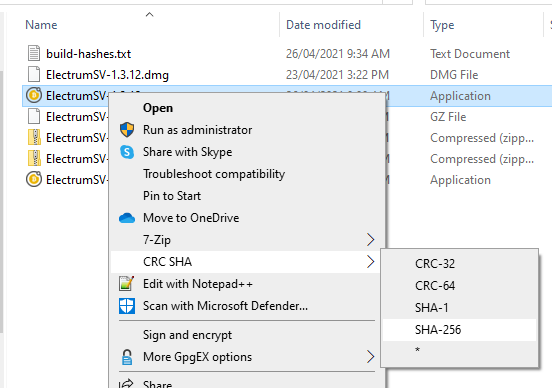
The 7-Zip context menu.
In this case, we selected the SHA-256 menu option for the ElectrumSV-1.3.12.exe file and
the following image shows the resulting checksum.
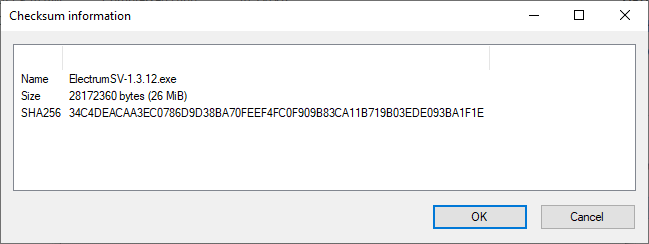
The 7-Zip checksum result.
If you find the ElectrumSV-1.3.12.exe entry in the
linked Github list,
you can see it matches the 7-zip checksum result. The case of the letters does not matter, both
lower case and upper case are equivalent.
MacOS
The following approaches require the user to deal with the terminal. If you are unable to work out how to do this, remember you can always file a support request on the official ElectrumSV issue tracker.
shasum
This approach requires no application installation, but it does involve you being willing to
use the terminal application. If you do not know how to locate this, start by opening the
launchpad application using it’s rocket icon in the dock.

Open the launchpad application search.
You should see the screen shown below. Enter terminal and it should show you one matching
application which you should open.

Search for the ‘terminal’ application.
Work out what directory the terminal is looking at, and change it using the cd command. In the
case shown below, the downloaded file was conveniently located in the Downloads folder and
as this should also be the case for you the required commands should be the same.
Type cd Downloads followed by shasum -a 256 <filename> where you replace <filename>
with the actual file name of your download. Shown below, the file name was
ElectrumSV-1.3.12.dmg and if you downloaded this file you also would use
shasum -a 256 ElectrumSV-1.3.12.dmg as shown.
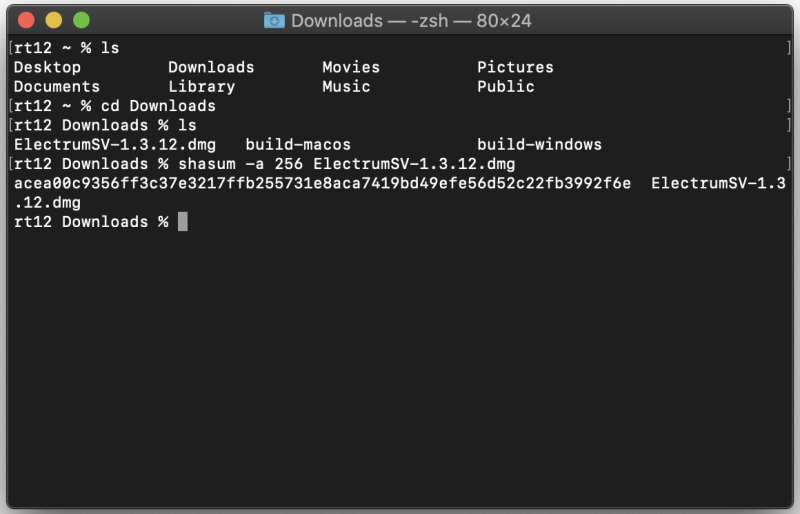
Run the ‘shasum’ application on your downloaded file.
If you find the ElectrumSV-1.3.12.dmg entry in the
linked Github list,
you can see it matches the shasum checksum result. The case of the letters does not matter,
both lower case and upper case are equivalent. If you get a different result, and the command
complains that it cannot find the file, then the file is not in the current directory. You need
to use the cd command to change the current directory as mentioned above.
GNU Privacy Guard
By installing GNU Privacy Guard (GPG) you have a way to verify that the signatures provided by the developers for the files you download, prove those files came from those developers. This is quite involved to do, but it might be that you are more comfortable with this approach.
Start by downloading and installing GPG from the GPGTools web site. This gives you a way to check signatures for files. The next step is to obtain the keys for the ElectrumSV developers, and to register them with GPG. This is a little complicated so you need to follow these steps.
Open the pubkeys folder from the official
ElectrumSV Github repository
in Safari. You should see two files listed, rt121212121.asc and kyuupichain.asc. For each
file perform the following key import actions.
Key import
Remember that this has to be done for all of the listed public keys in the ElectrumSV Github
folder. Once you are viewing the raw page for a key, select (press Command with a) and
copy (press Command and c) the key text.

Select and copy the public key text.
As soon as you have copied the key text, the GPG application you installed will signal that it has detected a public key was copied. You will see it’s icon in your dock jumping up and down. Click on it to import the key.

Observe the GPG icon in the dock indicating that it can act on the copied key.
The GPG application will require you to approve the import, so go ahead and do that.
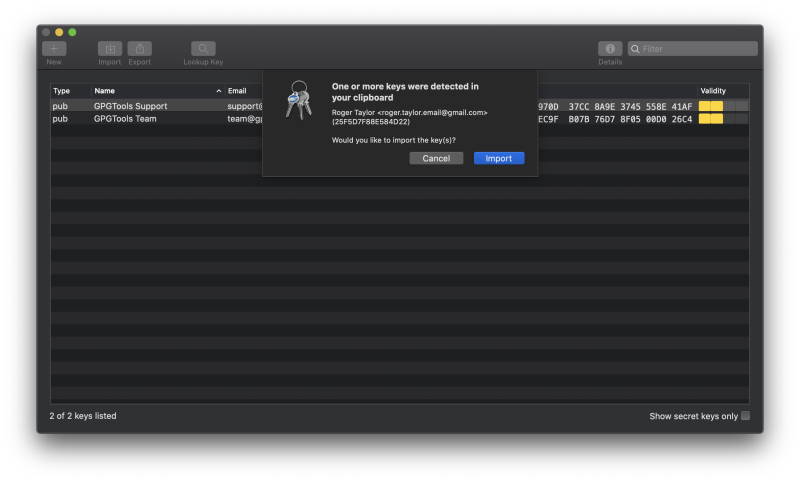
Approve the public key import.
Once the public key is imported, you will see another sheet drop down to tell you if it was imported successfully or not. It will of course be successful.
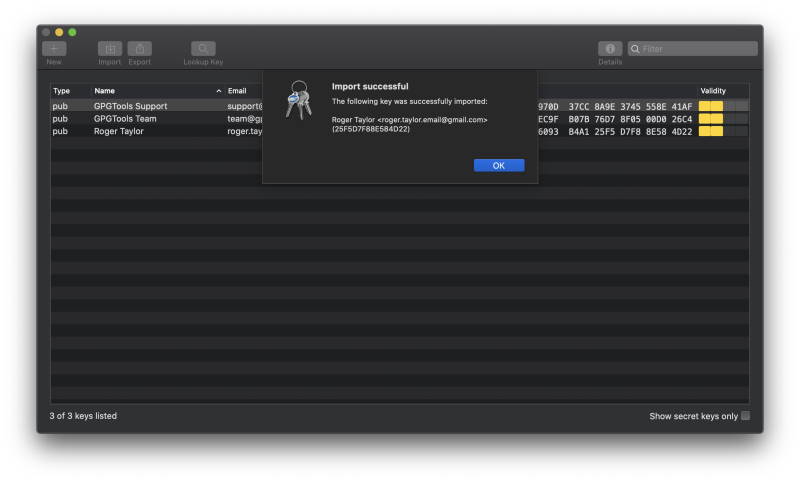
Observe the successful public key import.
You can confirm the key was imported successfully, by observing that it is now present in the list in the GPG application.
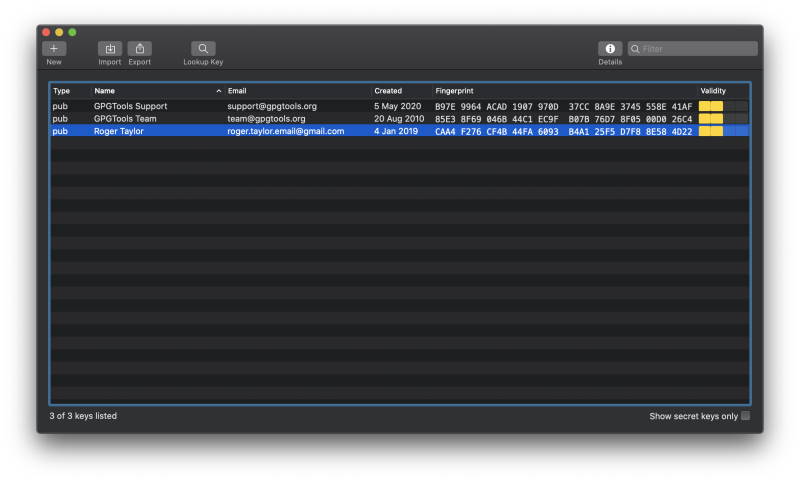
Observe the imported public key is present in your GPG application.
Go ahead and import any keys you haven’t imported already, then you are all set to verify the signature of an ElectrumSV download when you need to.
Verify a download
Let’s say you have downloaded ElectrumSV-1.3.12.dmg from the official ElectrumSV
downloads page. You now need to find and download the
signature for that file, so that you can verify it was created by the ElectrumSV developers. The
signatures are located on the official ElectrumSV web site, under it’s
download folder. The .dmg you downloaded was for version
1.3.12 so locate the folder by that name, and look inside it. You should see the signature
file ElectrumSV-1.3.12.dmg.sig, which is what you need to download ElectrumSV-1.3.12.dmg.
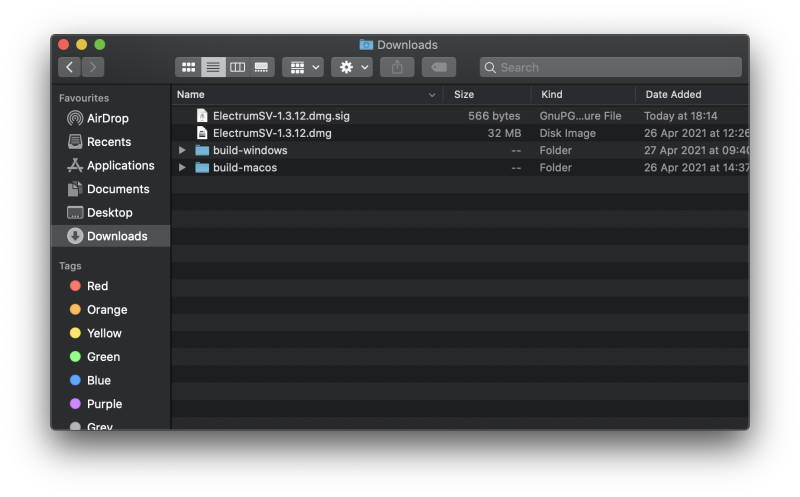
Confirm you have downloaded both the .dmg and the matching .dmg.sig files.
Open the context menu for the ElectrumSV-1.3.12.dmg file (press Control when you click on
the file). You will see a Services sub-menu, with an additional
OpenPGP: Verify Signature of File beneath it. Click on this verify sub-menu.
Open the context menu and select the OpenPGP verify entry.
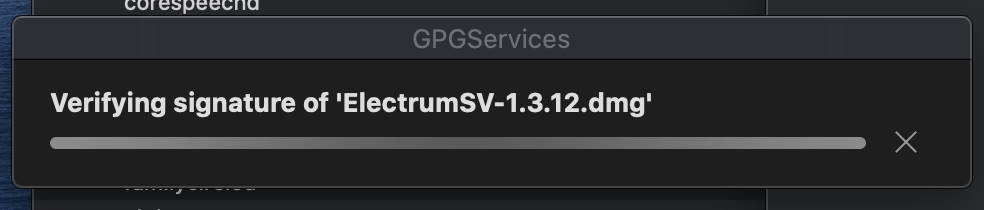
The GPG application will verify the .dmg using the detected matching .dmg.sig file and
let you know the result.
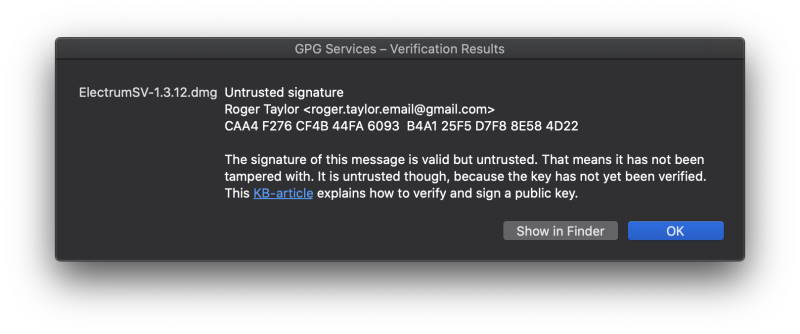
Observe the verification result.
As you can see the signature was verified. If you want to go through the process of trusting the ElectrumSV keys, there is a link there you can use for next time.